Building an IoT Water Quality Device
Using Arduino Uno to Get a Simple Measurement of Water Quality
Every year over 2 billion people are drinking contaminated water, leading to over 485,000 deaths! When I want a drink, I can get up and walk to my kitchen and grab one without having to worry if it is safe or not. My health has never been at risk because I was thirsty, but for many people, it is.
It’s not just third world countries either, in Flint around 90 people got sick and 10 died, and in Toledo, 500,000 people lost access to water for days over cyanobacteria scare. With climate change this issue is only getting worse…so what can we do about it? IoT!!!
Understanding the Global Water Crisis
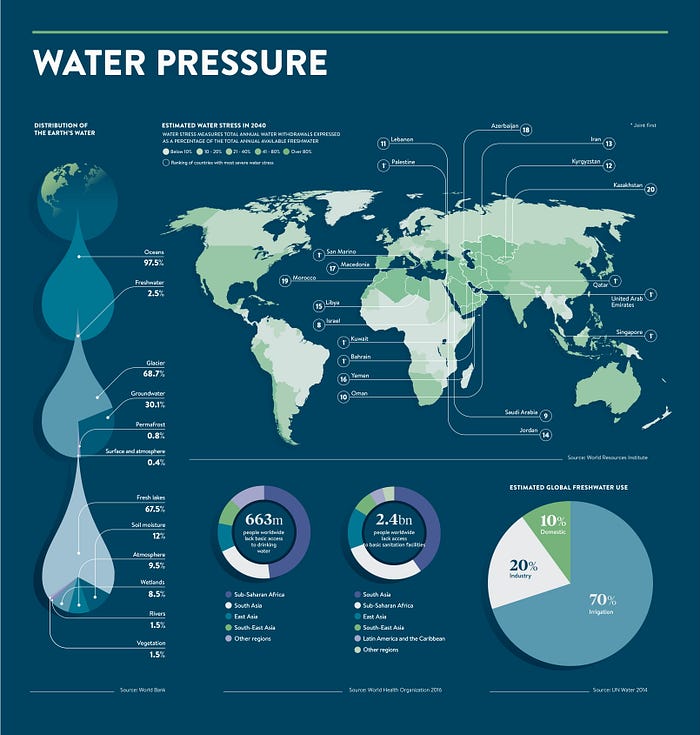
From Flint, Michigan to Sub-Saharan Africa, water is a major issue. Water is essential to sustaining life, yet many communities cannot get enough of it. Those with access to water struggle to find water clean enough to drink and use.
According to the World Economic Forum, 1 out of 9 people lacks access to clean water, which brings the water crisis to #5 in the top issues needing to be addressed. Not only is it an issue now, but by 2050 water demand is expected to grow by 55%, leaving over 240 million people without access to clean water.

So, why don’t we have enough water?
Over usage and Overpopulation
By 2050, we are expected to have 9.7 billion people on Earth, 2 billion more than we currently have! 🤯We use water for drinking, making food, production, and a bazillion other things, which is why it is so necessary but also running out.
Out of our total global water consumption, around 66% of it goes to making food, especially our meat products. We are talking big numbers like:
- 240 gallons for a loaf of bread
- 12 gallons for a serving of potato chips
- 493 gallons for a pound of cheese
- 122 gallons for 2 pints of milk
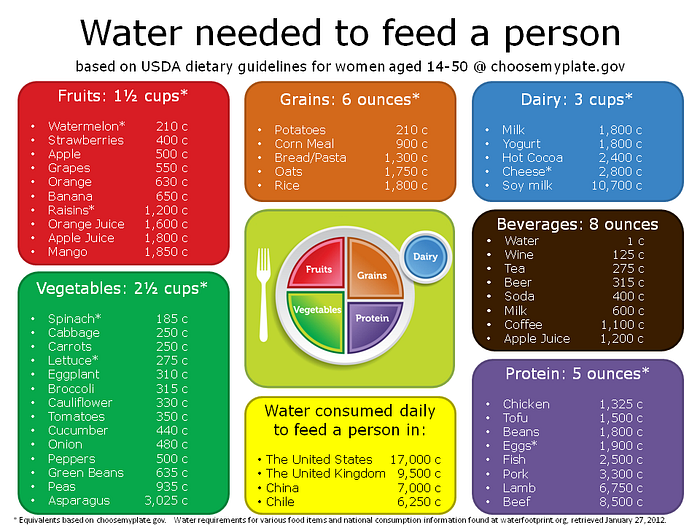
And, with the world population growing exponentially, that means exponential mouths to feed, and exponential amounts of water used. Even if we cut out the meat and dairy, produce uses a lot of water too. Pretty much all food does!
Another big issue within the overpopulation realm is overusing the water we do have. The average American uses around 82 gallons of water daily, which is equivalent to a little over a bathtub! And this isn’t just for drinking water or food either, but for things like leaving on the facet, taking a long shower, etc.
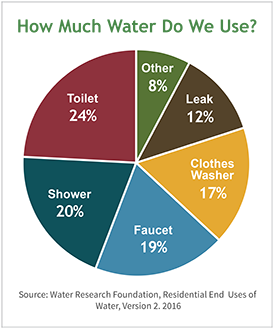
It’s easy to forget that just because it seems like we have excessive amounts of water doesn’t mean we actually do!
Water Pollution
Another big issue resulting in increased water scarcity is water pollution. Going back to the food thing, the use of pesticides and other fertilizers can clog up the good water we do have, making people sick.
Things such as improper disposal of waste, like sewage 🤢 and chemicals from factories, can result in the waste getting into the water systems, and then into our bodies!
I mean, think about back in the early 2000s, when 3M was disposing of PFC (perfluorocarbons) into the water system, resulting in cancer, birth defects, and infertility across Minnesota. If something like that could happen in the United States, what about somewhere with fewer regulations?

Natural Disasters
Finally, natural disasters also play a big role in the lack of clean water. Think about any hurricane ever… you see thousands of people lined up trying to get bottled water because they no longer have access to clean water.
Events such as floods, landslides, tsunamis, storms, heat waves, cold spells, droughts, and waterborne disease outbreaks all fall into the category of natural disasters that can impact water. 74% of natural disasters that occur are water-related and can take out water supply for weeks.
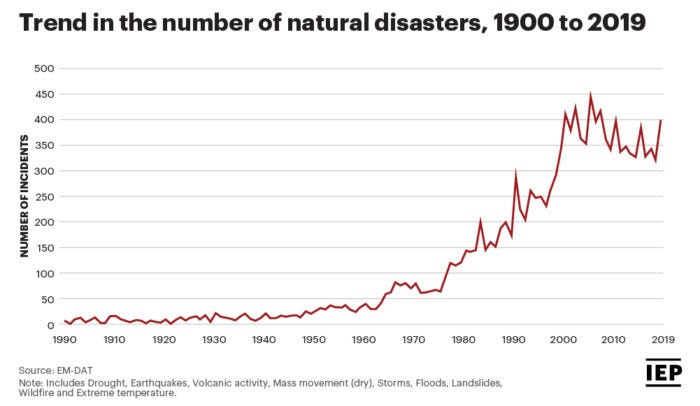
Once a natural disaster occurs, not only is there a lack of access to water, but also a heavy financial toll put onto the area. This financial toll can make it harder to get crucial infrastructure like water filtration plants back up and running quickly.
These aren’t the only issues causing the global water crisis, but I choose to highlight them because they are major issues impacting people from essentially everywhere in the world. Now that we know the problem, are you ready to find out the solution?

Using IoT to Measure Water Quality
Right now, there are a million different ways we could approach the global water crisis. From LifeStraws to conflict resolution, there are already people approaching the problem from all sides.
I choose specifically to tackle water quality because it is something easy that people from everywhere could use to prevent drinking unsafe water. I know this doesn’t tackle the problem for people without any water to drink, but it could help those in natural disasters or during everyday life stay as safe as possible.
When I started looking into measuring water quality, I didn’t really know a lot about how it works. I mean, I knew if it looks weird you probably shouldn’t drink it 😂, and there are a lot of big terms I don’t know. So, I am going to start by defining some of the important terms for you:
- Water quality: Chemical, physical, biological, and radiological characteristics of water
- EC: Electrical conductivity of the water. This is an important measure of the salinity of the water, which could determine if it is safe or too salty to drink.
- TDS: Total Dissolved Solids. TDS is important for making sure you have enough minerals and nutrients in your water, without having too much. The ideal range is around 300–500 ppm (parts per million).
Now that we know the keywords, we can jump into how IoT can help.
A brief definition of IoT (Internet of things) is a device that is connected to the internet that collects data. If you want to learn more about this, check out my article on everything you need to know about IoT here. IoT is super important anytime we are collecting data because it can help us easily communicate it.
When we are talking about water quality, one of the best uses of IoT would be to monitor what’s in the water. So, there is a couple of different sensors we can use to do this.
TDS Meter
First, we have a TDS meter. A TDS meter measures both total dissolved solids, and electrical conductivity (salinity). When it is collecting TDS, the TDS meter sends a small (invisible 👻) electrical charge through the water, which returns the number of dissolved solids in the water.
Then, using the formula below, the electrical conductivity can be calculated. Since each dissolved solid has a distinct charge, this is pretty easy! Electrical conductivity is measured in siemens or microsiemens, which is just a unit of measurement.
mg/L TDS (mg/L) = EC (dS/m) x 640
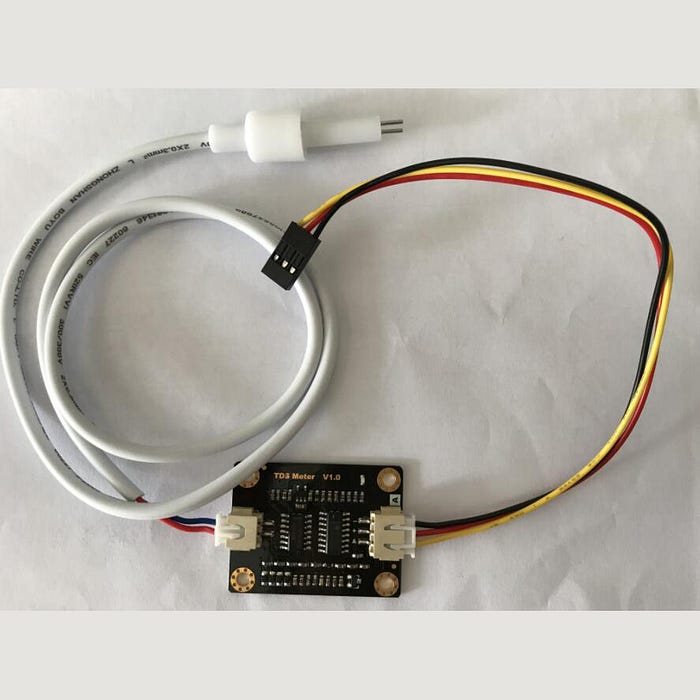
For my project, I used a TDS meter that could be easily interfaced with my Arduino Uno, which looks like this:
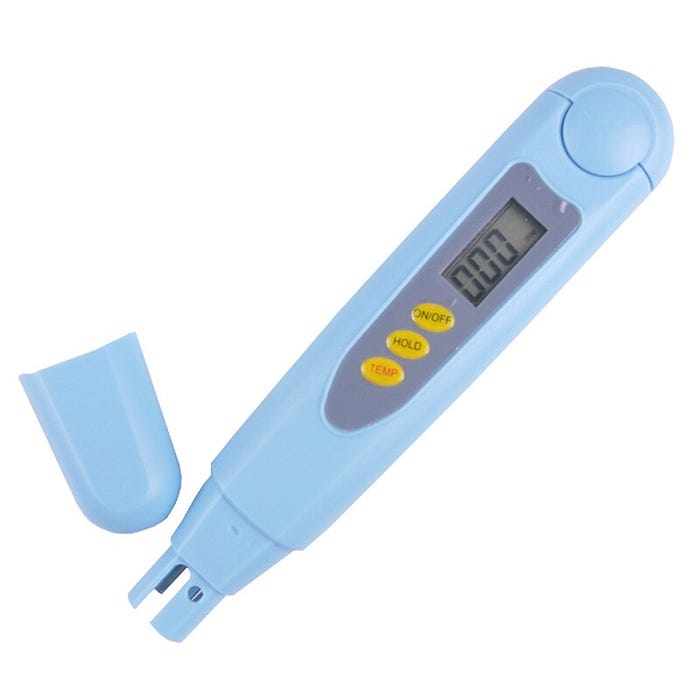
Another option if you aren’t using it for IoT purposes is a TDS pen:
Temperature Monitor
The other sensor I used was the temperature monitor. I know it seems stupid, because does it really matter that my water is above, below, or at room temperature? But turns out, the temperature actually has a lot to do with the quality of water.
The higher the water temperature, the faster reactions occur, which is why heat things up a lot in chemistry. Faster reactions mean things like minerals get dissolved quicker, and the water has a higher electrical conductivity.
When we think about what this means for humans, it means that water too cold could have too many minerals in it, making us sick. But, water too hot can also be dangerous, because it doesn’t have enough minerals and nutrients.
If we want to think outside of humans, the high temperature means a low amount of dissolved oxygen in the water, which could be fatal for fish and aquatic animals. With seafood and aquatic animals playing crucial roles in both the economy and our food supply globally, this could be really bad for us too!!!
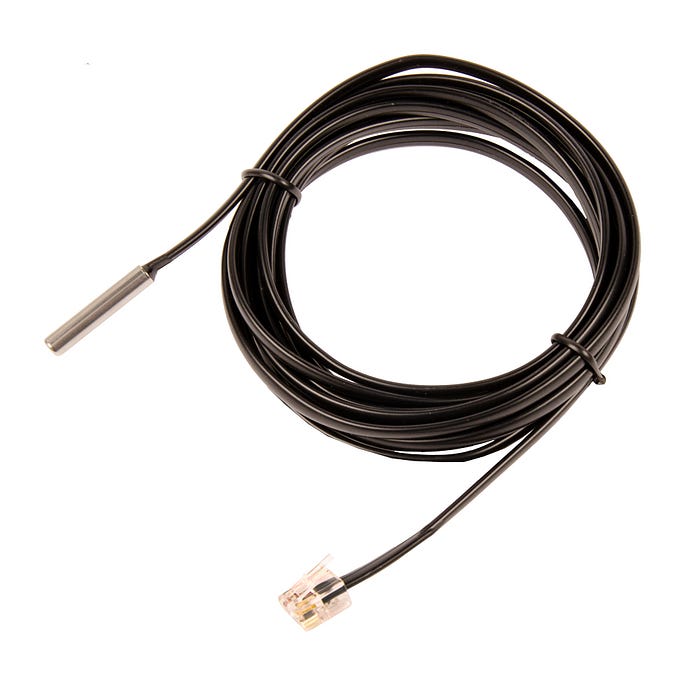
So, to test out the temperature of my water, I used a simple Onewire ESP32 sensor. Not only is this sensor waterproof, but it is also super easy to interface with an Arduino device and doesn’t take up much space!
I had to do some electrical work to make the wires work, but once that was done it was easy peasy! Mine looks pretty similar to the device pictured below:
Now, I only used two different sensors because that was what worked best for the goal I intended: basic (and easy) water quality measurements. But, there are tons of other sensors out there that can measure water quality:
- pH sensor: measures the acidity or alkalinity of a solution and is important when measuring acidification of water
- Dissolved oxygen: how much oxygen is in the water. Dissolved oxygen is important for monitoring agriculture and hydroponic applications, as well as the health of rivers, lakes, and oceans in terms of the life they can sustain.
- Turbidity sensor: measures the clarity of the water. Turbidity is important for measuring how much solid material is suspended in the solution.
- Residual Chlorine: measures the amount of free and combined chlorine in the water. Residual chlorine is important to monitor in water treatment facilities and agriculture applications.
- Ammonia Nitrogen Sensors: measure the amount of ammonia nitrogen in the water. Ammonia nitrogen is important to measure in fish farms, agriculture, and other places where too much ammonia nitrogen could endanger wildlife and humans.
Building My Device
Alright, let’s get to the fun stuff… building the actual device!!! As we discussed above, the device has two main sensors: the temperature sensor and the TDS meter. It also has an LCD (Liquid Crystal Display) to show the results.
So, the first step in building the device is prepping the materials. Once I got all my materials (ordered from Amazon of course), I laid them out and organized them by when I would use them. This helped me keep track of everything I needed and take inventory.
Next, I did a deep dive into all things, Arduino Uno. This included labeling all of the board's parts, looking at other projects, and following tutorials to understand the code. This really helped me get a feel for how to do things with the specific tools I had.
TDS Meter
Once I understood what I was doing, I started building. So first, I added my TDS meter, because it could stand alone with just the board.

The part I circled in lavender is the TDS meter. From there, you can see 3 wires: yellow, red, and black. All of the wires go to the area underlined with the purple color to connect them to the Arduino Uno.
The red wire is responsible for providing power to the sensor. I connected it to the 3.3 voltage spot so that I could have the 5 voltage open for my breadboard (the big white piece).
The black wire is responsible for the common path of the electric circuit, which basically means it connects the voltage throughout the different wires in the sensor. It is connected to the GND, which stands for ground.
Finally, the yellow wire is responsible for the output. I connected it to pin 8 of the digital side of the Arduino, which allows it to provide data from the water to my code.
Onewire Sensor
After I connected the TDS meter with the Arduino Uno, I next worked on connecting the Onewire temperature sensor.
Since I already had the TDS meter in the 3.3V and I knew I needed to connect at least 2 more parts to power, I decided to use a breadboard. A breadboard is just a board with holes that allows you to complete an electric circuit.
Interfacing the breadboard was pretty easy. I connected a black wire to the negative side of the breadboard and then to the GND (the same function as the GND used in the TDS meter). Then, I connected a red wire to the positive side of the breadboard, and then to the 5V on the Arduino Uno.

Once the breadboard was set up, I started connecting my Onewire sensor. As I mentioned earlier, I had to combine the sensor and some breadboard wires to connect it to the breadboard, which I did by stripping and cutting the wires and then putting them back together.
I then plugged the red wire (for power) into the positive side to connect it to the Arduino power source, and plugged the black wire into the negative side to do the same with the Arduino ground. The last wire I had to attach was the yellow wire for output, which I put in pin 2, using a resistor to also connect it to the GND.

Now that the sensors are all set up, all you have left to do is set up the LCD to display your results!
LCD Display
The LCD display was probably the most difficult part of setting up my device because it has so many different points of connection. Not only does it have the basic power (red), GND (black), and output (yellow) parts, but it also has multiple different controls, such as the read and write wire.
The first thing I did was connect the potentiometer, which is a small device that lets me control the brightness of the screen. It is attached to the V0 pin and the positive and negative sides of the breadboard.
After I attached the potentiometer, I started connecting the controller pins. Pins D4-D7 are attached to the digital pins 7–12 on the Arduino Uno. These pins help control the commands going out of the Arduino to the LCD.

Finally, after the command pins are attached, I attached the E pin, which enables to LCD to turn on and accept commands from the Arduino. And that is it! The device is built!
Coding the Device
Now that the device is ready to go, it’s time to code it! To code Arduino, you need to download the Arduino IDE software, which you can get from the Windows Store or online.
The first step is uploading the libraries. For this project in particular we need to include: Onewire (for Onewire device), Dallas Temperature (for Onewire sensor), and Liquid Crystal. You can do this easily with #include!

Next, we have to set up the code so we can be ready to carry out our functions. This includes defining the OneWireBus (the data wire for Onewire sensor), initializing the pins for the LCD and TDS meter, and setting up some conversions.
To start, let’s set up the LCD pins. The important pins to initialize are rs (register select, allows us to pick characters), EN (enables LCD), and D4-D7 pins (allows us to communicate with LCD). We can do this with a simple const int, and then the Liquid Crystal lcd() function.

The ONE_WIRE_BUS is easily defined as 2, the place it is plugged into the Arduino.
Now, we get to initialize where all the sensors are attached. To do this we use int, the variable, and then the pin number. For example, int Temperature=2.

Finally, we have to set up some conversion rates, which allow us to convert between metric and imperial units, as well as provide room for different types of water and chemicals to be tested. We can do this using float.

The last thing we need to do before creating our function is connecting Onewire and Dallas temperature libraries with the sensors, so they can communicate. Both libraries have functions of oneWire and sensors that make this easy to do!

Now we are ready to get into our main functions! The first big piece of code we need is for the setup function. The setup function runs code one time to set up the device for the loop functions.
Inside the setup function, begin the serial port (which sends information back and forth between the Arduino and the sensors), begin the sensors, set up which pin is responsible for input and output, and print out our starting directions!

The void setup function is crucial to run any program in Arduino because it starts the communication from the device to sensors.
The next big function we have is the loop function. The loop function runs commands over and over again and is useful for data collection. For our loop function, we are going to get the results from the temperature sensors and TDS meter, and print it into the serial monitor (which shows you the results on your computer).


Finally, the last function we have is the GetEC function, which calls all the information we have collected from the TDS monitor, and displays the results in the serial monitor and on the LCD.

The convert to EC takes the total dissolved solids and calculates the electrical conductivity value based on it.

The implement for temp section takes the electrical conductivity and estimates the temperature based on it, which can be used to validate the value from the Onewire sensor.

This last part prints are values to the LCD so that we can see the results we got in our serial monitor. That’s all!!!!
This is what you should see once you test out your device:

The Future of IoT and Water
This project may seem like something small, but it is just one small step in a brighter future. A simple water quality monitor, that is both cheap and easy to use, could change the fate of many people affected by bad water.
Over and over again I keep saying that water is essential and clean water is even more important, and this is ABSOLUTELY true! We are growing rapidly in every field imaginable, and the future of water monitoring needs to be the next one. IoT is a great tool to make this possible because it has infinite capabilities.
In the field of IoT, we talk a lot about smart cities, and in these smart cities, as important as security and power management is, water quality is going to be just as important. IoT allows us to make sure that nothing like what happened in Flint will happen again.
If you’ve made it this far, thank you! I am a 15-year-old who is interested in regenerative medicine, biocomputing, and public health. If you want to see me continue to grow and 10X myself, sign up for my newsletter here!
